If you own, are buying, or are dreaming about a log home, you’ve probably typed “What Is Chinking on a Log Cabin” into a search bar at least once. Maybe you’ve noticed gaps between your logs, cold drafts in winter, or you’re just trying to understand what all those white lines between the logs actually do.
My name is Brad D. Siler, owner of Pencil Log Pros here in Western Colorado. Most days you’ll find me on scaffolding or lifts, sealing, repairing, and restoring log homes from Grand Junction up into the high country. When homeowners ask me, “What Is Chinking on a Log Cabin, and do I really need it?” my short answer is: yes, and it’s one of the most important pieces of your log home’s protection system.
This guide is written specifically to answer What Is Chinking on a Log Cabin in clear, practical language. We’ll cover what chinking is, how it works, why it matters so much in Western Colorado, and how to know when it’s time for repair or replacement. By the end, you’ll not only understand what chinking is—you’ll know how it protects your log home for years to come.
What Is Chinking on a Log Cabin? (Quick Answer)
Let’s start with the direct, simple answer to the question: What Is Chinking on a Log Cabin?
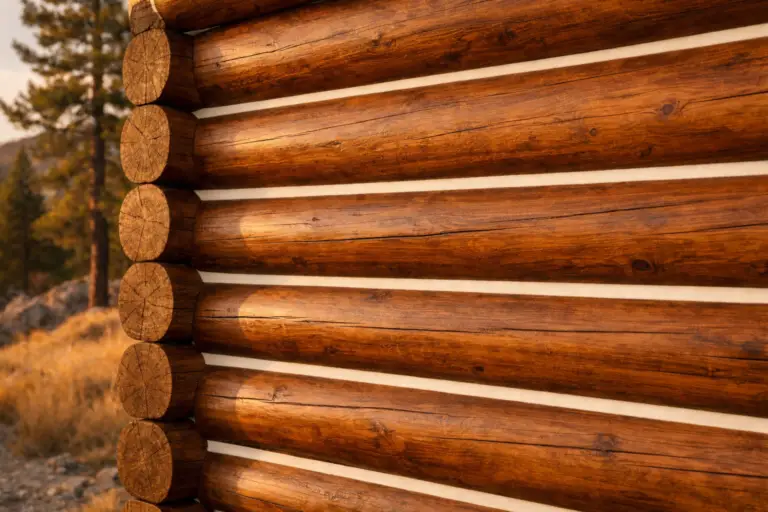
Chinking is the flexible material installed between the logs of a log cabin or log home to seal the gaps and create a weather-tight, energy-efficient, and visually appealing wall system. When someone shows you a picture of a classic log home and asks “What Is Chinking on a Log Cabin in this photo?” it’s the lighter-colored bands between each course of logs, usually visible on the exterior and sometimes on the interior.
On older cabins, chinking was often a rigid mixture of cement, clay, sand, straw, or whatever the builder had available. On modern log homes, chinking is usually a specially formulated elastomeric product – think of it as a high-performance, flexible sealant designed specifically for log construction.
So when we answer What Is Chinking on a Log Cabin for our clients, we explain that modern chinking is designed to:
- Seal the joint between the logs and stop air leaks
- Keep out wind-driven rain, dust, and insects
- Flex with the natural expansion, contraction, and settling of the logs
- Support the log stain and clear-coat system for long-term protection
In short, the true answer to What Is Chinking on a Log Cabin is: it’s a flexible, protective seal that works as a critical part of your log home’s overall envelope.
What Does Chinking Do for a Log Cabin?
Once you know What Is Chinking on a Log Cabin in basic terms, the next question is “What does it actually do for my home day-to-day?” Chinking is doing more behind the scenes than most people realize.
Seals air leaks and improves comfort
Even well-built log homes have natural irregularities where logs meet. Without a proper answer to What Is Chinking on a Log Cabin—without a real chinking system—those irregularities turn into air leaks. In winter, heated air escapes and cold drafts sneak in. In summer, hot air leaks in and your cooling bill climbs.
High-quality chinking creates a continuous, flexible seal that dramatically reduces air leakage. You’ll feel the difference standing near exterior log walls – fewer cold spots, less draft, and more even temperatures throughout the home.
Keeps out water, wind, dust, and insects
Unsealed or poorly sealed joints between logs are an invitation for trouble:
- Wind-driven rain working its way into small gaps
- Dust and pollen blowing in around outlets, trim, and corners
- Spiders, ants, wasps, and other insects finding easy entry points
- Rodents following gaps and voids at corners and underneath decks
Proper chinking creates a durable barrier that blocks those intrusions. When you fully understand What Is Chinking on a Log Cabin, you realize it’s your first line of defense against water and pests working their way through joints and into your log walls.
Supports long-term log health and finishes
Chinking works together with your stain, clear coat, and other sealants. When the gaps between logs are tight and properly chinked, water has fewer places to sit and soak into the wood. That means less rot, fewer soft spots, and a longer life for your stain and clear coat.
Well-designed chink joints also help shed water instead of trapping it. When combined with proper washing and surface preparation, this contributes to a finish system that performs much better over time.
Improves the look and perceived value of your home
From the street, What Is Chinking on a Log Cabin also has a visual answer: those clean, even bands between logs are part of the classic log home style. Crisp, consistent chinking makes the home look well cared for. Cracked, dirty, or missing chinking instantly makes a cabin feel neglected.
Buyers notice this. When people tour a log home and ask their agent “What Is Chinking on a Log Cabin and is this in good shape?” the state of your chink lines can directly affect how they feel about the home’s condition—and its value.
A Short History of Log Cabin Chinking
To really understand What Is Chinking on a Log Cabin today, it helps to know where it came from. The materials and methods have changed dramatically over the last century.
Traditional “whatever you have” chinking
Early builders didn’t have modern products. Their version of What Is Chinking on a Log Cabin was simple: anything they could stuff or pack between the logs to slow down wind and rain. Common traditional materials included:
- Clay, mud, and soil
- Straw, grasses, animal hair, or moss
- Lime and sand mixtures
- Later, cement and mortar-based mixes
These materials did an okay job for a while, but they had a major flaw: they were rigid. Logs expand, contract, twist, and settle over time. Rigid chinking doesn’t move with the wood, so it cracks, crumbles, or pulls away, opening gaps for air and water.
Mortar-based chinking on historic cabins
Many historic cabins and early 20th-century log buildings still have mortar-style chinking. When people see these and ask, “What Is Chinking on a Log Cabin in older structures?” the answer is usually a cement or lime-based mortar.
It looks sturdy, but it often hides problems. As the logs move and the mortar doesn’t, gaps form behind the rigid layer. Water works its way behind, and the logs quietly rot out. Part of our historic work is deciding when to preserve that look and when to replace it with modern chinking for safety.
The move to modern elastomeric chinking
Modern chinking products are designed specifically to solve the “rigid vs. moving log” problem. Instead of acting like a rock glued between logs, elastomeric chinking stretches and compresses as the logs naturally move. This flexibility is the key to long-term performance and the modern definition of What Is Chinking on a Log Cabin.
Today, most new log homes and professionally restored cabins rely on synthetic, flexible chinking products that are:
- UV resistant
- Weather resistant
- Paintable or stainable
- Textured to blend with the logs
- Designed to bond strongly to wood
How Modern Chinking Works
When homeowners want a more technical answer to What Is Chinking on a Log Cabin, we talk about joint design. Modern chinking isn’t just “filling cracks”—it’s a carefully built system.
The anatomy of a chink joint
A proper chink joint usually includes:
- The two logs forming the top and bottom of the gap
- A correctly sized backer rod (a foam rod) set at the correct depth
- The chinking bead applied on top of the backer
- Tooling (smoothing and shaping) the bead to the right thickness and profile
The backer rod is critical. It controls the depth of the chinking and ensures it bonds to the logs, not to the back of the joint. This “two-point adhesion” is what allows the chinking to stretch and compress without tearing itself apart. In other words, a big part of What Is Chinking on a Log Cabin is the invisible backer and joint design behind what you see.
Flexibility vs. hardness
With chinking, harder is not better. A good product will:
- Stretch significantly before it fails
- Recover its shape rather than permanently deforming
- Maintain adhesion to the logs while moving
In Western Colorado, our temperature swings and high UV exposure are constantly asking that chink line to adapt. When you ask What Is Chinking on a Log Cabin that can survive here, the real answer is “a flexible system designed for movement,” not “a hard mortar line that will crack.”
Why log movement matters so much
Logs are living material, even after they’ve been cut and stacked. They respond to moisture, temperature, and load. Over time they:
- Shrink as they continue drying
- Settle and compress under the weight of the structure
- Twist or check (split) as internal stresses release
- Expand and contract seasonally
Your chinking has to handle all of that movement. If it can’t, you’ll see cracking, tearing, or complete separation from the log faces. That’s why, when we design log chinking and sealant systems, we start from a deep understanding of log movement, not just from what looks good on day one.
Types of Chinking Used on Log Cabins
Another piece of the What Is Chinking on a Log Cabin puzzle is understanding that “chinking” is a category, not one single product. Different cabins and different goals call for different approaches.
Modern elastomeric chinking
This is the standard for most contemporary log homes. It’s usually:
- Acrylic- or latex-based
- Textured to resemble mortar or rough wood fiber
- Available in multiple colors to match or contrast your stain
- Compatible with most modern stain and clear-coat systems
When someone with a newer home asks What Is Chinking on a Log Cabin like mine, we’re almost always talking about one of these modern elastomeric systems.
Mortar or cement-based chinking
We still encounter mortar-based chinking, especially on very old cabins, historic buildings, and some early “modern” log homes. While it can be part of a restoration strategy, it’s rarely the best long-term solution for a home you plan to live in and heat year-round.
Specialty chinking products
There are also specialty products designed for:
- Extreme cold climates
- High-movement structures
- Special appearance requirements (very smooth or very coarse texture)
- Interior-only applications
When we build a full log home plan, we match the specific answer to What Is Chinking on a Log Cabin like yours with products that fit your climate, exposure, and finish system.
Chinking vs. Caulking: What’s the Difference?
A very common follow-up to What Is Chinking on a Log Cabin is “Isn’t that just caulk?” The short answer: no—but they work together.
Chinking: Wide joints between logs
Chinking is typically used for larger, visible joints – often one to several inches wide – between full rounds or square logs. It’s meant to be seen, and it plays both a functional and decorative role. When you picture What Is Chinking on a Log Cabin, you’re usually picturing these wide bands.
Caulking or log sealant: Smaller detail joints
Caulking or sealant is used for smaller gaps such as:
- Checks (cracks) in the logs
- Trim and window/door interfaces
- Corner notches and tight joints
- Joints between log walls and other materials (stone, siding, etc.)
These sealants are often smoother and less textured than chinking. They serve to close small cracks and seams that would otherwise let in water or air. On most modern log homes, the two systems work together: chinking for the big gaps, and log sealant or caulking for the fine detail work.
Do All Log Cabins Need Chinking?
Another angle on What Is Chinking on a Log Cabin is: does every log home need those visible white or tan lines? The answer depends on how the home was built, but every log structure needs some way to seal joints.
Chink-style vs. chinkless log construction
Log homes are typically designed as either “chink-style” or “chinkless”:
- Chink-style homes are built with the expectation that visible joints will be filled with chinking.
- Chinkless homes use logs milled and fitted tightly enough that the gaps are minimal, and sealants are hidden in grooves or gaskets between the logs.
Even chinkless systems can develop gaps over time as logs dry and move. We often get called in to seal joints on chinkless homes that are 10–20 years old and starting to feel drafty.
Historic and older cabins
Older cabins almost always require some sort of chinking or re-chinking to be comfortable and weather-tight, especially if you’re using them as full-time residences. In these situations, What Is Chinking on a Log Cabin becomes partly a structural question and partly an aesthetic one—we often blend modern performance with a traditional look.
Signs Your Log Cabin Needs New Chinking
Sometimes homeowners only start Googling What Is Chinking on a Log Cabin after they see obvious problems. Here are some clear warning signs that your chinking is failing.
Visible gaps or daylight between logs
If you can see daylight through the joints between your logs, you’ve got a problem. Even small pinholes can indicate larger voids behind the surface. Check around corners, under eaves, and behind decks where previous work may have been rushed.
Cracked, pulling, or separating chinking
Take a slow walk around your home and look closely at the chink lines:
- Do you see cracks running along the length of the bead?
- Is the chinking pulling away from one or both logs?
- Can you see edges curling up or lifting?
Those are signs that the product is no longer stretching with the logs. Gaps may already exist behind the visible bead.
Drafts and temperature swings
Inside, pay attention to how the home feels:
- Do certain rooms feel colder, especially near exterior log walls?
- Do you feel air movement on windy days near outlets, baseboards, or around trim?
- Does your heating or cooling system seem to run constantly?
These symptoms often trace back to failing chinking and sealant systems.
Water stains, moisture, or insect activity
Inside and outside, look for:
- Dark streaks or staining running down from chink lines
- Soft or punky wood near joints
- Carpenter ants, beetles, or other insects emerging from gaps
- Spider webs clustering around obvious air leaks
These are all signals that your chinking needs professional evaluation and likely repair. If chinking failure has already led to rotten logs, that’s where our log repair and replacement work comes into play.
What Proper Chinking Installation Looks Like
From the ground, good chinking might just look “clean and straight,” but there’s a lot that goes into doing it right. A complete answer to What Is Chinking on a Log Cabin always includes how it’s installed.
Assessment and planning
Every successful chinking project starts with a thorough assessment. We look at:
- Log condition (rot, checks, previous repairs)
- Existing stain and finish condition
- Existing chinking or sealants (type, adhesion, flexibility)
- Exposure (sun, wind, snow load, sprinkler overspray)
This informs decisions about which areas need full removal and replacement versus targeted repairs, and how chinking will fit into the broader repair or restoration strategy.
Surface preparation
Preparation is the unsung hero of a long-lasting chinking job. It may include:
- Washing and rinsing log surfaces to remove dust, pollen, and contaminants
- Scraping or grinding out loose or failed chinking
- Removing loose, peeling finish near joints
- Treating any active mold or mildew
Without clean, sound surfaces, even the best chinking won’t bond correctly. That’s why we often pair chinking work with professional washing and surface prep.
Backer rod and masking
Next, we install backer rod of the correct diameter into the gaps between logs. This sets the depth of the joint and ensures the chinking can move properly. Masking tape is often applied above and below the joint to create straight, crisp lines and protect log faces from smears.
Applying and tooling chinking
The chinking is applied either by bulk gun, pump, or cartridge, depending on the project. The bead is then tooled – smoothed and shaped – to the right thickness and profile. Proper tooling:
- Ensures solid contact with both logs
- Removes air pockets and voids
- Creates a neat, visually consistent appearance
Once the chinking is in place, it needs time to cure. Only after it’s fully cured should stain or clear coat be applied over or near the chink joints, if the system is designed for that.
Common Chinking Problems and What Causes Them
When chinking fails, it’s rarely just “bad luck.” There’s usually a root cause that needs to be addressed so you don’t end up asking What Is Chinking on a Log Cabin again in a few years because everything failed and has to be redone.
Cracking and tearing
Cracks along the length of the chink bead or tears near one log often indicate:
- Improper joint design (too deep or too shallow)
- No backer rod, or the wrong size backer rod
- Using a rigid or low-movement product where high movement occurs
Loss of adhesion
When you see the chinking pulling away from the logs in strips or chunks, it usually comes back to poor surface prep or incompatible products. Dirty, chalky, or glossy surfaces are difficult for chinking to bond to without proper preparation.
Water behind chinking
If water gets behind the chink line, it can sit against the log faces and slowly cause rot. This often happens when:
- Chinking is applied over existing structural problems
- Upper details like gutters, flashings, or rooflines are dumping water directly on walls
- Sprinklers are hitting the same area day after day
This is why chinking should never be treated as a band-aid over serious structural or moisture issues. Those need to be resolved as part of a comprehensive plan.
How Chinking Interacts with Stain, Clear Coat, and Log Finishes
Your chinking doesn’t live in isolation; it works together with your stain and clear coat to protect the logs. A complete explanation of What Is Chinking on a Log Cabin always includes its relationship to your finish system.
Order of operations
In most restoration projects, the order looks like this:
- Wash and prep the logs.
- Address structural and log repairs.
- Install or repair chinking and major sealant joints.
- Apply stain and/or clear coat as the final protective layer.
There are exceptions, especially when we’re doing targeted chinking repairs on an otherwise sound finish system, but in general, chinking before final finishes gives the best long-term performance.
Color and appearance
Chinking can:
- Blend with the log color for a subtle, uniform look
- Contrast with the logs for a bold, traditional “log-and-mortar” appearance
We can often tune the visual effect during a larger restoration project by adjusting both the chinking color and the stain system to complement each other.
DIY Log Cabin Chinking vs. Hiring a Professional
Many log homeowners are handy and enjoy tackling projects themselves. When they first search What Is Chinking on a Log Cabin and see photos online, it can look like “just running a bead of material between logs.” In reality, the difference between DIY and professional chinking shows up in performance and lifespan.
Good DIY candidates
In general, homeowners can often handle:
- Very small touch-ups on existing chink lines
- Sealing minor checks (cracks) in logs that are otherwise sound
- Re-chinking small interior areas at ground level
These types of tasks usually involve minimal staging, limited product quantities, and lower risk if something goes wrong.
Projects better left to the pros
Larger chinking projects can quickly become complex:
- Two- and three-story walls
- Areas over steep grades or difficult terrain
- Homes requiring extensive removal of failed chinking
- Cabins with existing moisture or structural issues
These jobs require staging, safety equipment, specialized tools, and a deep understanding of how chinking interacts with the rest of the building envelope. They’re also physically demanding; a full re-chink on a good-sized home is a major undertaking.
When chinking is part of a bigger project that includes repairs, we fold it into a full log home restoration scope instead of treating it as a stand-alone task.
How Much Does Chinking Cost?
Cost is always part of the real-world version of What Is Chinking on a Log Cabin. Chinking cost varies widely from project to project. Anyone who gives a one-size-fits-all number is guessing. That said, some key factors drive the cost:
- Size and height of the home
- Ease or difficulty of access
- Condition of existing chinking and finish
- Extent of underlying log damage or structural issues
- Whether chinking is part of a full restoration or a stand-alone project
Full re-chinking a large home is a significant investment, but it’s also a long-term one. Done correctly, high-quality chinking can last many years and dramatically improve comfort and energy efficiency.
Maintaining Your Chinking So It Lasts
Once you’ve invested in quality chinking, a little maintenance goes a long way toward extending its life and avoiding the “What Is Chinking on a Log Cabin and why is mine failing again?” problem down the road.
Regular inspections
At least once a year – and ideally after harsh seasons – walk around your home and look closely at:
- Chink lines on all exposures
- Areas near downspouts, decks, and roofs
- South- and west-facing walls that take the brunt of sun and weather
Catch small issues early and you can often address them with minor repairs instead of major work.
Cleaning and minor touch-ups
Keeping your chinking and logs clean helps finishes and sealants last longer. Gentle washing with appropriate cleaners removes dust, pollen, and pollutants that can degrade finishes over time.
Many of our clients prefer to roll this into a recurring log home maintenance program so they don’t have to remember schedules or climb ladders themselves.
Chinking and the Western Colorado Climate
Here in Western Colorado, What Is Chinking on a Log Cabin is also a climate question. Our conditions are harsh, and not every product or method is up to the challenge.
High UV exposure
Our sun is intense, especially on south- and west-facing walls. UV exposure breaks down finishes and can also affect chinking over time. That’s why we take exposure into account when choosing products and designing joint profiles.
Freeze-thaw cycles
In mountain areas, moisture can find its way into small gaps and then freeze, expanding and stressing both the wood and the chink joint. Proper sealing and drainage details, combined with appropriate product choices, help keep this under control.
Wind and dust
The wind in the valleys and on exposed ridges can drive dust and fine particles into any available gap. Quality chinking and sealants go a long way toward keeping that dust out of your living space, which you’ll notice on your furniture and in your air quality.
Frequently Asked Questions About Log Cabin Chinking
What Is Chinking on a Log Cabin, in the simplest words?
If you’ve been scrolling and just want the shortest possible answer to What Is Chinking on a Log Cabin: it’s a flexible, protective sealant system between your logs that keeps out weather, drafts, and pests while allowing the logs to move naturally.
Is chinking absolutely necessary on my log home?
If your home was built as a chink-style log home, the answer is yes. The design expects those gaps to be sealed with chinking to perform correctly. If your home is chinkless, you still need some form of joint sealing, even if it’s concealed gaskets or sealants instead of visible chink lines.
How long should good chinking last?
With proper installation and reasonable maintenance, quality elastomeric chinking can last many years. The exact lifespan depends on exposure, product choice, and the condition of the logs and finishes around it.
Can you change the color of existing chinking?
In many cases, yes. Some chinking products can be stained or overcoated as part of a larger restoration project. In other cases, it’s better to remove and replace sections with a new product and color. This is something we evaluate during our inspections.
Do you chink the inside of a log home too?
Often, yes. Interior chinking is common on chink-style homes and can be important for comfort and air sealing. Interior chinking usually sees less weather and UV exposure, but it still needs to handle log movement.
When to Call a Log Home Chinking Specialist
If you’re seeing any of the red flags we’ve talked about—visible gaps, failing chink lines, water staining, insect activity, or significant drafts—it’s time to have your home evaluated by someone who works on log homes every day.
At Pencil Log Pros, we combine chinking and sealant expertise with:
- Comprehensive log home restoration plans
- Structural and cosmetic log repair and replacement
- Professional log chinking and sealant application
- Ongoing maintenance programs to keep your investment protected
- Thorough washing and surface prep to support long-term finish performance
That whole-house perspective matters. Chinking is too important to treat as a quick patch. Done right, it’s a critical part of your home’s comfort, beauty, and structural health.
Conclusion: What Is Chinking on a Log Cabin – and Why It Matters
So, What Is Chinking on a Log Cabin, really? It’s more than just the lines between your logs. It’s a flexible, high-performance sealing system that:
- Keeps out wind, water, dust, and insects
- Makes your home more comfortable and energy efficient
- Helps preserve your logs and finishes
- Enhances the look and value of your cabin or home
Now you don’t just know the textbook definition of What Is Chinking on a Log Cabin – you also understand how it should be installed, how it works with your stain and finishes, and how to spot problems before they become expensive repairs.
If you own a log home in Western Colorado and you’re unsure about the condition of your chinking, don’t wait for small problems to become big ones. A professional evaluation can give you a clear picture of what’s working, what’s not, and what it will take to get your home performing the way it should.
Whether you need a few strategic repairs or a full chinking and restoration plan, Pencil Log Pros is here to help you protect what you’ve built – and enjoy it for years to come.