Log rot is one of those problems that looks small until you start probing it. What appears to be a “dark stain” can turn into missing fiber, soft corners, and a log that’s no longer carrying load the way it should.
Log Home Wood Rot Repair: How to Stop Decay, Rebuild Strength, and Keep It From Coming Back
If you’re searching for log home wood rot repair, you’re probably seeing one (or more) of these: punky wood around log ends, soft sill logs, blackened lower courses, or rot where a deck, gutter, or roof valley dumps water. The stakes are real—money, structural integrity, finish failure, and sometimes safety.
In Colorado and surrounding mountain regions, the cycle that fuels rot is usually a combination of intense UV (finish breaks down), snow and wind-driven moisture (wetting), and freeze–thaw (cracks open and hold water). The good news: most rot is fixable if you stop the water first and repair to truly sound wood.
Fast Answer: Log rot repair works when you (1) eliminate the moisture source, (2) remove decay back to sound wood, (3) treat and dry the area, and (4) rebuild the log profile with the right method—dutchman patch/scarf splice for real structural loss, epoxy consolidation only where it’s appropriate—then seal end grain and re-finish so water can’t return.
- Do first: Trace and fix the water path (gutters, drip edges, deck ledgers, splashback, failed caulk, grade).
- Check: Probe for sound wood and verify moisture content before rebuilding or coating.
- Avoid: “Capping” soft wood with filler or stain—rot keeps spreading underneath.
- Best fix: Remove decay to clean fiber, then use a wood-to-wood dutchman/splice when strength is compromised; use epoxy selectively for stabilization and profiling.
- Hire a specialist when: Rot is on sill logs/corner posts, extends under windows/doors, affects load-bearing areas, or keeps returning after previous repairs.
Signs you’re dealing with log home rot repair (not just weathering)
- Punky, spongy wood: A screwdriver or awl sinks in and the fibers crush instead of resisting.
- Dark staining that doesn’t sand off: Gray weathering is surface-level; decay often shows deeper brown/black discoloration, especially in checks and end grain.
- Crumbly wood at log ends or notches: End grain wicks water fast—rot starts there and travels inward.
- Soft sill logs (lowest course): Splashback, snow drift, and grade issues feed decay at the bottom of the wall.
- Peeling stain or “wet look” patches: If a finish stays darker in one area after dry weather, it’s often holding moisture.
- Insect activity plus softness: Ants and beetles don’t “cause” rot, but they love compromised fiber and can accelerate damage.
- Repeated caulk/chinking separation near the same spot: Movement plus moisture intrusion is a common combo at penetrations and deck-to-wall transitions.
Why this happens (the real causes)
Rot isn’t a mystery—it’s biology plus building details. Wood-decay fungi need oxygen, the right temperature range, and enough moisture for long enough. In most log homes, the trigger isn’t “bad logs.” It’s water management and surface protection.
- Chronic wetting at details: Roof valleys, short overhangs, missing kickout flashing, overflowing gutters, and downspouts that dump at corners are repeat offenders.
- End grain exposure: Log ends, cuts, checks, and butt joints wick water. If end grain isn’t sealed and maintained, it’s a rot invitation.
- Trapped moisture behind films: Some coating stacks don’t breathe well. When moisture gets behind them, it can’t exit—so decay quietly accelerates.
- Checks that hold water: Checks are normal. The problem is checks that collect water, connect to joints, or run into end grain without being detailed and protected.
- Splashback and grade: Mulch, soil, rock landscaping, and decks too close to logs keep the lower courses wet.
- UV breakdown first, moisture second: High-elevation UV cooks coatings. Once the finish thins, water gets into the wood more easily, and freeze–thaw works those openings wider.
Step-by-step process
1) Find and stop the water source (before you touch the rot)
Tools/materials: Hose test (controlled), ladder (or drone), flashlight, mirror, tape measure, camera/phone, notepad.
What to do: Trace where water starts and where it lands. Look above the damage: roof edge, gutters, downspout discharge, deck ledger, window sill, and any penetration.
Quality checks:
- Downspouts discharge away from the home (not onto lower logs or corner posts).
- Gutters aren’t overflowing or back-pitching.
- Kickout flashing exists where roof meets wall, and water is directed into gutters.
- Deck-to-wall connection isn’t trapping debris and moisture.
- Grade/landscape isn’t bridging the bottom log course.
2) Define the repair boundary (probe to sound wood)
Tools/materials: Awl/ice pick, sharp chisel, moisture meter, painter’s tape/marker.
What to do: Probe around the suspect area to map how far rot travels. Don’t trust the surface. Rot often extends farther along the grain than you expect.
Quality checks:
- Sound wood resists the probe and shaves clean; decayed wood crushes, flakes, or feels “stringy.”
- Mark the boundary where fiber is consistently firm and clean.
- If the area is near structural points (sill logs, corners, posts, openings), assume the repair is structural until proven otherwise.
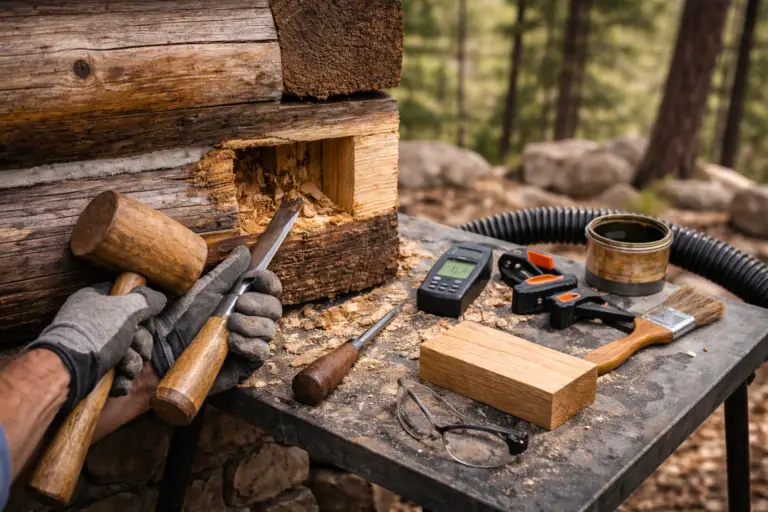
3) Remove decayed fiber back to clean, solid wood
Tools/materials: Oscillating tool, rotary tool/grinder with appropriate attachments, chisels, mallet, shop vac, HEPA dust control where needed.
What to do: Remove everything that’s compromised. If you leave “a little soft,” you’re leaving active decay and a weak substrate for bonding.
Quality checks:
- Edges are firm enough to hold fasteners (if wood-to-wood repair) and accept bonding (if epoxy is used).
- No crumbly transition zones remain.
- Repair cavity is shaped intentionally (clean geometry beats ragged gouges).
4) Dry the area and treat appropriately
Tools/materials: Fans, dehumidifier (as needed), moisture meter, borate wood preservative (where appropriate), clean spray bottle/pump sprayer.
What to do: Wood needs to be dry enough for your chosen repair method to bond and perform. Borates are commonly used to make previously wet zones less hospitable to decay fungi and many insects, but they work best when the wood is kept dry afterward.
Quality checks:
- Moisture content is verified before rebuild and before coating (don’t guess).
- Any treatment is applied per manufacturer guidance (coverage and dwell time).
- Root causes of wetting are corrected so the treatment isn’t being asked to “fight a river.”
5) Rebuild the log profile with the right method (structure first, cosmetics second)
Tools/materials: Matching wood stock (species/profile), saws, chisels/planes, clamps, structural epoxy systems (used selectively), fasteners, layout tools.
What to do: Choose the repair type based on how much fiber is lost and whether the log is load-bearing or part of a critical joint.
- Dutchman patch: Wood-to-wood replacement for localized loss—excellent for restoring strength and original profile when fitted tight.
- Scarf splice: Longer, tapered splice when damage extends along a log—helps spread load and makes a strong, clean transition.
- Partial log replacement: When the damage is too extensive for a patch, but a full log replacement isn’t necessary.
- Epoxy consolidation/fill (selective): Best for stabilizing slightly softened zones and rebuilding profile where wood-to-wood replacement isn’t practical—NOT a substitute for replacing missing structural wood.
Quality checks:
- Replacement wood matches species and grain orientation as closely as possible.
- Joints fit tight—no daylight, no wobble, no dependence on “thick glue lines.”
- Fasteners are placed to avoid splitting and to hold the patch mechanically, not just chemically.
- Profile is restored so water sheds (no flat ledges or pockets).
6) Seal end grain and detail checks so water can’t return
Tools/materials: End-grain sealer, compatible sealants, backer rod (where joint geometry requires it), tooling knives.
What to do: The longevity of a log home rot repair depends on what happens after the rebuild. End grain and water-trapping geometry are where repeat failures start.
Quality checks:
- End grain is sealed and maintained as part of the finish system.
- Checks that collect water are addressed (cleaned, detailed, and sealed only where appropriate—don’t “caulk every check” blindly).
- Joints are designed correctly (backer + proper tooling) to reduce premature sealant failure.
7) Blend sanding and re-coat with a compatible finish system
Tools/materials: Sanders, abrasives, dust control, stain system, brushes/sprayers (as appropriate), wet film gauge (where used), masking.
What to do: Rot repair and finish work are married. If the surrounding finish is failing, a small repair can turn into a patchwork look—and an early maintenance headache.
Quality checks:
- Feathered transitions (no hard edges where the new system meets old).
- Coatings are applied within manufacturer temperature/humidity limits.
- Water beads appropriately after cure (simple, real-world indicator of protection).
8) Document what you did (so the next maintenance cycle is easy)
Tools/materials: Photos, notes, product labels/batch info.
Quality checks:
- You know what products were used, where, and when.
- You have a plan for touch-ups on the highest exposure walls (often south and west at elevation).
Options and tradeoffs
Not all log cabin rot repair methods are equal. The “best” choice depends on severity, location, and whether you’re restoring strength or just stabilizing surface fiber.
| Method | Best For | Pros | Tradeoffs / Watch-outs |
|---|---|---|---|
| Epoxy consolidation (selective) | Slightly softened areas, non-critical profiling | Stabilizes fiber; can rebuild profile cleanly; fast turnaround | Not a substitute for missing structural wood; needs proper dryness and prep; can look “plastic” if overused |
| Epoxy fill only | Small voids after removing decay | Seals and shapes well when used correctly | Fails when applied over damp/soft wood; can trap moisture if detailing is wrong |
| Dutchman patch (wood-to-wood) | Localized rot at corners, log ends, faces | Restores real wood strength; blends naturally; sheds water when profiled right | Requires precision fitting; needs matched wood and good joinery |
| Scarf splice | Longer rot runs, mid-log damage | Strong structural transition; spreads load; durable | More labor; requires careful layout and fastening |
| Partial log replacement | Large rot zones on a course without full replacement | Gets you back to sound wood comprehensively | More invasive; needs careful temporary support in some cases |
| Full log/course replacement | Severe, continuous rot; compromised sill logs | Resets the structure completely in that area | Highest cost/complexity; often requires jacking/support and careful sequencing |
If you’re already planning a full exterior reset (strip, repair, borate, stain/topcoat), bundle rot repairs into that scope so your finish system is continuous and easier to maintain. Our log home restoration process is built around that “whole system” approach when it’s warranted.
Safety
Rot repair often involves ladders, power tools, dust, and chemical products (borates, epoxies, solvents). Keep it simple and disciplined:
- Dust control matters: Sanding old coatings and decayed fiber can create harmful dust—use appropriate respiratory protection and containment.
- Lead is possible in older coatings: If your home has very old paint layers on trim or nearby surfaces, follow lead-safe practices.
- Don’t work wet: Wet wood + power tools + ladders is a bad combination. If conditions are slick, pause.
- Mind cure windows: Epoxies and finishes have temperature limits. Forcing cure in cold or damp conditions leads to failure.
Decision checklist (use this before you choose a “quick fix”)
- Can you name the moisture source? If not, you’re not ready to repair.
- Does the probe hit sound wood within a shallow depth? If it keeps sinking, plan for wood-to-wood repair or replacement—not filler.
- Is the damage on a sill log, corner, post, or around an opening? Treat it as structural until confirmed otherwise.
- Will the repaired area shed water? If your finished shape creates a ledge, the rot will return.
- Is your surrounding finish system stable and compatible? If the “neighborhood” is failing, the repair won’t last as long as it should.
- Do you have safe access? If you can’t reach and prep properly, you can’t bond properly.
Common mistakes that cause expensive failures
- Repairing before fixing water management: Gutters, downspouts, kickouts, and grade should be handled first—or the same rot comes back.
- Leaving “a little soft” wood: Epoxy and fillers don’t magically stop decay if you bond to compromised fiber.
- Using epoxy everywhere: Overbuilding with epoxy can create hard edges, poor blending, and moisture traps if detailing is wrong. Use it selectively.
- Ignoring end grain: A beautiful dutchman patch can still fail if the end grain next to it keeps wicking water.
- Caulking every crack: Some checks should be left to breathe; others should be detailed. Blanket caulking often fails and looks worse over time.
- Skipping moisture verification: If you rebuild and coat damp wood, bonding and cure suffer—and you’re trapping the original problem.
- Patchwork finishing: Spot-staining without proper feathering and compatibility checks leads to lap marks, peeling edges, and mismatched sheen.
- Not addressing splash zones: Mulch beds, snow drift lines, and irrigation overspray are rot factories for lower courses.
Pro field notes (what Pencil Log Pros looks for on-site)
- We start above the rot and follow the water path down—roof valleys, gutter seams, missing kickouts, and overflow marks tell the story fast.
- Lower courses get a “splashback audit”: grade height, mulch/rock, dripline, and how snow piles in that area.
- We probe around fasteners and penetrations—lag bolts, deck ledgers, hose bibs, and light mounts often hide moisture channels.
- We look for “rot repeats”: the same corner post rotting again usually means the detail is wrong, not the repair method.
- We check log ends and notches for end-grain exposure and previous seal attempts that have failed.
- We watch for finish clues: chalking, flaking, and “always darker” patches are moisture indicators even before wood feels soft.
- We map sun exposure (south/west) versus shaded faces—high UV failure on one side and moisture/bio-growth on the other can require different prep.
- We look at joint geometry where chinking and sealant meet wood—poor backer/bond patterns cause edge failure that admits water.
- We pay attention to wood species and profile (round vs D-log vs hand-hewn) because it affects how water sheds and how repairs should be shaped.
- We evaluate whether rot is cosmetic or structural by location first, then depth—sill logs and corners get treated with extra respect.
- We plan repairs so future maintenance is easier (clean transitions, documented products, and details that shed water).
Maintenance plan
The best rot repair is the one you never need twice. Here’s a practical, seasonal plan that fits Colorado’s sun, snow, and freeze–thaw reality.
Spring (after snowmelt)
- Walk the perimeter and check lower logs for splashback staining, softness, and new gaps.
- Clean debris from gutters and confirm downspouts discharge away from the foundation.
- Look for new checks that connect into end grain or joints; address water-trapping geometry early.
- Spot-check suspect areas with a probe—don’t wait for “visible rot.”
Summer (UV season)
- Monitor south and west walls for finish thinning, chalking, and fading.
- Touch up compatible stain/topcoat before bare wood is exposed broadly.
- Confirm sprinklers/irrigation aren’t soaking lower courses or corner posts.
Fall (before freeze)
- Seal known end-grain vulnerabilities and confirm caulk/chinking edges are intact at high-movement joints.
- Verify kickouts and flashing at roof-to-wall intersections.
- Trim vegetation that holds moisture against the structure.
Winter (monitoring)
- Watch snow drift lines against lower walls and clear where it repeatedly piles.
- Look for ice dam patterns that dump water onto logs during melt cycles.
- Plan spring repairs early—rot work often needs dry windows for best results.
When to hire a specialist
DIY can work for very small, shallow rot in non-critical areas—if you can stop the water, remove all decay, and rebuild properly. Bring in a specialist when any of these are true:
- Rot is on sill logs, corners, posts, or around doors/windows.
- The probe sinks deep or rot runs along the grain beyond a small patch.
- You see movement, sagging, or gaps opening at joinery.
- Previous repairs have failed (repeat rot usually means the detail wasn’t corrected).
- Access is unsafe or requires complex staging.
- You need color matching and finish blending that won’t look patchy next season.
Why Pencil Log Pros
- We treat rot as a system problem: water management, wood condition, repair method, and finish compatibility—handled together.
- We repair to sound wood, not “good enough wood.” That’s where longevity starts.
- We use wood-to-wood dutchman patches and scarf splices when strength matters, and we use epoxy selectively where it truly fits.
- We restore log profiles so the wall sheds water—no ledges, no pockets, no hidden traps.
- We detail end grain and vulnerable transitions because that’s where rot begins.
- We understand Colorado exposure: high UV at elevation, long winters, freeze–thaw, and wind-driven wetting.
- We keep work clean and documented so future maintenance is straightforward.
- When a broader reset is needed, we integrate repair into a cohesive log home restoration plan instead of leaving you with mismatched systems.
FAQ
How do I know if I need log replacement versus a patch?
If you can remove all decay and reach solid wood with a defined boundary, a dutchman patch or splice often works well. If rot is continuous along a log, affects a sill log, or compromises corners/posts, replacement (partial or full) may be the safer long-term move.
Can I just fill rot with epoxy and paint/stain over it?
Only if the decay is fully removed and the remaining wood is sound and dry enough for bonding. Epoxy over soft or damp wood is a common failure. Epoxy is a tool—not a cure for missing structure.
What’s the fastest way to stop rot from spreading?
Stop the moisture source and dry the area. Rot needs sustained moisture. Fix gutters, flashing, splashback, and end-grain exposure first, then repair back to sound wood.
Does borate treatment “kill” rot?
Borates can help create conditions that are less favorable for decay fungi and many insects, but they’re not magic if the wood stays wet. Think of borates as an added layer of protection after you fix the water problem—not the primary solution.
Why does rot show up around decks so often?
Deck ledgers and deck-to-wall transitions collect debris, hold moisture, and create shadowed drying conditions. Add fasteners and penetrations, and you have a perfect pathway for water to enter.
Should every check in my logs be caulked?
No. Some checks should be left to breathe; others—especially those that hold water, connect into joints, or run into end grain—should be detailed. The right approach depends on location, exposure, and the finish system.
Can I stain right after rot repair?
You can stain after repairs once the substrate is properly prepared and within the finish system’s moisture/temperature requirements. Rushing stain onto damp wood is one of the quickest ways to cause peeling and repeat problems.
What’s the most common place you see log home wood rot repair needed first?
Sill logs (the lowest course), log ends, and corners are top of the list, followed closely by areas under roof valleys and around deck connections. Those are the places where water concentrates and drying is slow.
Will a rot repair match the rest of my logs?
It can—when the repair is shaped correctly and the finishing plan includes blending and compatibility checks. Color matching is part science and part craft, especially on sun-faded walls.
How often should I inspect my log home for early rot?
At least once a year, and twice a year is smarter in high-snow or high-UV locations. A quick spring walk-around after melt and a fall check before winter catches most issues early.
Ready for a clear rot repair plan?
If you’re seeing softness, dark staining, or recurring moisture around log ends, lower courses, decks, or corners, don’t wait for it to “dry out on its own.” Log rot repair is most affordable when it’s caught early and repaired to sound wood—before it turns into a replacement job.
Reach out to Pencil Log Pros with photos and the locations of concern. We’ll help you identify the likely moisture source, explain repair options (from dutchman patches to partial replacements), and map next steps so your log home wood rot repair actually lasts.
Sources
-
- USDA Forest Products Laboratory: Wood Handbook (wood decay, moisture, durability)
- OSHA: Respiratory Protection (when sanding, blasting, or working around dust/chemicals)
- EPA: Lead Renovation, Repair and Painting (RRP) Program (lead-safe practices for older coatings)