If your log cabin is starting to look gray, blotchy, or “tired,” you’re not alone. Colorado’s high-elevation sun, wind-driven snow, and freeze-thaw cycles can accelerate the breakdown of finishes faster than most homeowners expect.
This guide explains Total Log Cabin Restoration in plain English: what it includes, when you need it, and how the proper process protects your home for the long haul. If you’ve been searching for a real-world Total Log Cabin Restoration roadmap that fits Colorado conditions, you’re in the right place.
Why Total Log Cabin Restoration Matters in Colorado’s High-Altitude Climate
Many Colorado log homes sit between roughly 6,000 and 10,000+ feet in elevation. That means more intense UV exposure, faster drying, and more frequent moisture swings.
Those swings create checking (cracks), loosened joints, failed chinking, and water intrusion that leads to rot. A quick “re-stain” can look better for a season, but it rarely solves the underlying failure.
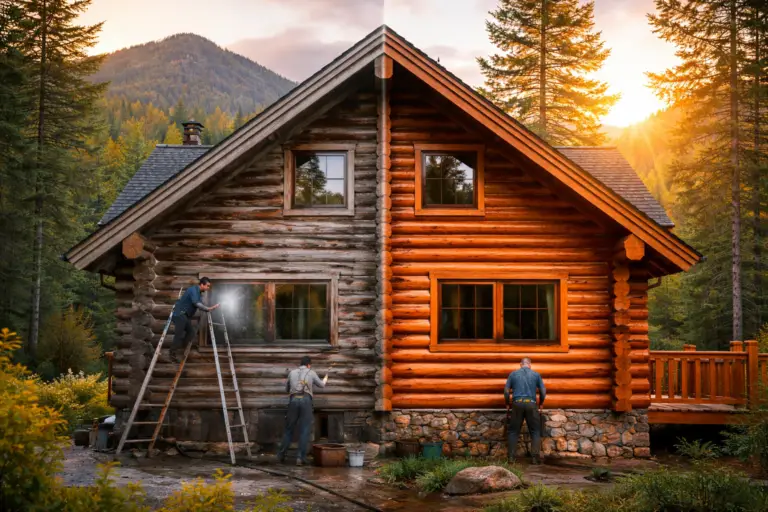
Total Log Cabin Restoration is different because it’s a full-system approach. It resets the exterior so the logs can shed water, breathe, and stay protected year after year.
What “Total Log Cabin Restoration” Includes
Homeowners sometimes assume Total Log Cabin Restoration means sanding everything to bare wood no matter what. In reality, it means restoring the entire exterior system so your cabin performs correctly in mountain weather.
- Full inspection with moisture awareness and problem-area mapping
- Cleaning, stripping, sanding, or media blasting based on the existing finish and wood condition
- Rot repair (from targeted epoxy work to dutchman repairs and selective log replacement)
- Borate preservation treatment in vulnerable zones when appropriate
- Staining and UV protection designed for high-altitude exposure
- Chinking and caulking repair to stop drafts and water intrusion
- Sealing checks, log ends, and transitions around windows, doors, and penetrations
- Final detail work plus a maintenance plan that keeps you out of “repair mode.”
If your cabin has peeling stain, recurring leaks, or soft wood anywhere on the exterior, Total Log Cabin Restoration is often the most cost-effective long-term option. You fix the causes once, then maintain the system instead of chasing failures every year.
Colorado-Specific Problems That Trigger Total Log Cabin Restoration
High-Altitude UV: Why Stain Fails Faster on Mountain Homes
Colorado sunshine is relentless, especially on south- and west-facing slopes. That’s where you’ll see fading, finish breakdown, and uneven absorption first.
When UV degrades surface fibers, the stain stops bonding evenly. That’s when patchy color, early peeling, and the “quilted” look show up.
- Gray or silvering wood, especially on exposed faces
- Flaking or peeling coatings
- Hard edges where new stain won’t blend
- Dry, thirsty logs that absorb stain unevenly
Freeze-Thaw + Wind-Driven Snow: The Moisture Intrusion Combo
Snow can sit against log walls for weeks, especially on shaded north sides. During warm daytime temps, meltwater can find its way into checks, joints, and failed chinking.
When temperatures drop again, that moisture expands and stresses the wood and sealants. Over time, small openings become big pathways for water, which is why Total Log Cabin Restoration often focuses on sealing and water management as much as staining.
Common Wood Species in Colorado Log Homes
Colorado log homes commonly use pine, spruce, and cedar. Each species can perform beautifully, but none are maintenance-free at high altitude.
Pine can show UV fading quickly on exposed walls. Spruce can be sensitive to moisture if details fail, and cedar still needs UV protection and correct sealing to prevent surface degradation.
Hidden Damage Zones Most Homeowners Miss
Many cabins look fine from the driveway. The real problems usually show up in the places you don’t casually inspect.
- The first two or three courses of logs near grade (splash-back and snow stacking)
- Under decks where airflow is reduced and moisture lingers
- Below roof lines where drip patterns hit the same area repeatedly
- Behind downspouts or where gutters overflow
- Around penetrations like lights, hose bibs, and exhaust vents
When these zones are active, Total Log Cabin Restoration isn’t just cosmetic. It becomes a protective rebuild of the exterior system.
Total Log Cabin Restoration Process: Step-by-Step
Every home is different, but the best results come from a consistent system. If steps are performed out of order, even premium products can fail early because moisture or adhesion issues were never addressed.
Step 1: Full Assessment (Moisture, Finish Failure, and Rot Mapping)
We evaluate each elevation because north-side shade problems differ from south-side UV problems. We also identify risk zones around log ends, deck ledgers, windows, and lower courses.
This planning step is a significant part of Total Log Cabin Restoration. It defines whether you need a maintenance refresh, a partial restoration, or a full prep-to-finish reset.
- Identify finish type and failure pattern
- Spot and map rot-prone details
- Choose the prep method needed to restore adhesion
- Plan repairs before applying new protection
Step 2: Protect the Site Before Work Starts
Colorado lots can be steep, wooded, and tight. Setting up adequately protects your property and keeps the work consistent.
Windows, stonework, landscaping, and nearby surfaces are protected before prep begins. For projects that require more aggressive removal, containment, and cleanup are built into the plan.
Step 3: Cleaning vs. Stripping vs. Media Blasting
Prep is where most jobs succeed or fail. The goal is a clean, stable surface so the stain system bonds evenly and lasts.
Total Log Cabin Restoration uses the least aggressive method that still achieves the right result. The proper prep depends on what’s in your cabin now and how it’s failing.
Cleaning can work when the system is intact but dirty, chalky, or lightly weathered. This is common on cabins that were maintained consistently.
Stripping and sanding are often needed when the stain is peeling, built up, or failing in layers. Removing failure restores uniform absorption and fixes blotchy color.
Media blasting can be the right tool when coatings are stubborn or failure is extensive. Done correctly, it restores a consistent surface without the shortcuts that cause premature failure.
Pressure Washing a Log Home: When It Helps and When It Hurts
Homeowners often ask whether they can pressure-wash a cabin and re-stain it. The risk is that high pressure can “fuzz” wood fibers, drive water deep into checks, and even blow out failing chinking.
In Colorado’s freeze-thaw environment, forcing water into the log system can create long-term issues. If pressure washing is part of your plan, it must be controlled and compatible with the bigger Total Log Cabin Restoration strategy.
Step 4: Rot Repair and Wood Restoration (Fix the Real Damage)
If rot is present, it must be addressed before staining and sealing. Covering rot with stain or caulk can trap moisture and accelerate decay.
We use a repair approach that matches severity, from stabilizing and rebuilding to dutchman repairs and selective log replacement. True Total Log Cabin Restoration means restoring wood profiles so water sheds correctly again.
- Remove damaged material until solid wood is reached
- Rebuild edges and profiles so water doesn’t sit
- Reinforce vulnerable areas with appropriate repair systems
- Seal transitions so water doesn’t immediately return
Step 5: Preservation Treatments (Borate) for Long-Term Protection
Borate treatments can add meaningful protection in the right conditions. They’re often used after proper prep and repair work, especially in zones with historic moisture exposure.
Borate works best as part of a complete Total Log Cabin Restoration system. Water management, correct sealing, and a breathable finish still matter most.
Step 6: Staining and UV Protection for Colorado Conditions
Once the wood is prepared and repaired, stain becomes a performance layer. In Colorado, stain selection and application matter because UV and weather conditions are constantly changing.
The goal is protection without trapping moisture. Prep quality controls how stain penetrates, how evenly it cures, and how long it lasts.
- Strong UV resistance for high-altitude exposure
- Breathability so logs can dry after snow and storms
- Even absorption that avoids blotch and striping
- Compatibility with chinking and sealing details
In most Total Log Cabin Restoration projects, sun-facing elevations get extra attention. Log ends also receive focused sealing because end grain absorbs moisture differently than face grain.
Step 7: Chinking, Caulking, and Sealing (Stop Leaks, Stop Rot)
Chinking and caulking are not just cosmetic. They are key parts of the weather barrier that keep your cabin comfortable and your logs dry.
Chinking is typically used in larger log-to-log joints, while caulking is used for smaller transitions and detail work. The right product in the right place is a core ingredient in Total Log Cabin Restoration.
- Visible separations where material has pulled away
- Cracks that open seasonally and don’t close back up
- Drafts, cold spots, or increased heating costs
- Recurring insect entry points in joints
- Water staining below joints or around window trim
We also seal checks and penetrations strategically. The goal is to block water entry while allowing the log system to breathe and dry.
Step 8: Final Quality Check + Maintenance Plan
A professional restoration ends with a walkthrough and a clear maintenance path. Without a plan, even excellent work can degrade faster than necessary.
We verify coverage, confirm sealing at transitions, and check that moisture sources are addressed. Then we outline what you should do annually so your Total Log Cabin Restoration stays protected for the long run.
What Pencil Log Pros Can Handle During Total Log Cabin Restoration
Total Log Cabin Restoration is rarely one single task. It’s a coordinated set of services that have to work together as a system.
- Log home restoration (prep-to-finish systems)
- Log home staining designed for high-altitude exposure
- Chinking and caulking repair or replacement
- Rot repair, including dutchman repairs and selective log replacement
- Media blasting when appropriate for the coating and condition
- Deck refinishing to protect adjacent wood systems
When one team handles prep, repairs, sealing, and finishing, the final system performs better. That’s how Total Log Cabin Restoration turns into long-term protection instead of a short-term facelift.
Real-World Colorado Scenarios That Often Require Total Log Cabin Restoration
Scenario 1: Peeling Stain + Gray Logs on the South Wall
This is one of the most common situations we see. Shaded sides look acceptable, but the south and west elevations are rough, faded, and peeling.
Total Log Cabin Restoration in this case typically means correcting prep and rebuilding the UV-protection system. If surface fibers are degraded, stain won’t bond correctly until the wood is restored.
Scenario 2: Rot at Deck Ledger + Dark Staining Below Windows
Deck connections and window transitions are moisture magnets. If water management is off, the same areas get wet repeatedly until rot develops.
In these cases, Total Log Cabin Restoration focuses on repair work, sealing, and correcting water pathways so the problem doesn’t come right back.
Scenario 3: Failing Chinking + Drafts + Higher Heating Bills
When chinking fails, your cabin can feel colder and less comfortable even if the logs look “fine.” Those gaps also become pathways for moisture and pests.
This is where Total Log Cabin Restoration often improves comfort as well as durability. When joints are restored properly, air leaks decrease and moisture intrusion drops.
How to Know You Need Total Log Cabin Restoration
Not every cabin needs a full restoration immediately. The key is knowing the difference between “maintenance time” and “system failure time.”
If you see multiple signs below, it’s smart to schedule an evaluation for Total Log Cabin Restoration:
- Peeling, flaking, or blotchy stain that won’t blend with touch-ups
- Gray wood showing through on major elevations
- Soft spots, punky wood, or areas that stay dark and wet-looking
- Cracked or separated chinking and caulk
- Water staining below gutters, decks, or window lines
- Recurring insect activity around joints or damp areas
A quick screen is to walk the exterior after a rain or snowmelt day. If certain areas stay wet long after everything else dries, those are priority zones for Total Log Cabin Restoration.
A Simple “5-Minute Exterior Scan” You Can Do Each Season
You don’t need to be a contractor to catch problems early. You just need a repeatable checklist.
- Look at south and west walls for fading and roughness
- Check lower logs for splash-back staining and softness
- Inspect log ends for cracking, darkening, or water absorption
- Scan window and door edges for failed caulk or gaps
- Look along chinking lines for separations and cracking
- Confirm gutters and downspouts send water away from logs
If you spot issues across multiple elevations, that’s a strong sign your cabin is moving beyond simple maintenance and toward Total Log Cabin Restoration.
What to Avoid (Mistakes That Make Restoration More Expensive)
Mistake 1: Over-Pressure Washing the Logs
Too much pressure can tear up wood fibers and force water into checks. That can trigger early failure and bigger repairs later.
Mistake 2: Staining Over Failing Coatings
If the old finish is peeling or built up unevenly, adding more stain rarely fixes it. It usually makes the next Total Log Cabin Restoration more difficult and expensive.
Mistake 3: Trapping Moisture With the Wrong Sealants
Not all sealants belong on log homes. Incompatible products can trap moisture and accelerate rot in freeze-thaw conditions.
Mistake 4: Ignoring Water Management
Gutters, downspouts, grading, and snow shedding matter. You can’t “seal your way out” of water dumping onto the same logs every season.
Why Pencil Log Pros for Total Log Cabin Restoration in Colorado
Colorado log homes need a restoration approach that respects the environment they live in. Pencil Log Pros focuses on systems, not surface-only fixes.
- Detail-first planning that prioritizes moisture control
- Correct prep methods to restore adhesion and even absorption
- Rot repair expertise that addresses causes, not just symptoms
- Chinking and sealing that supports comfort and protection
- Clear scope guidance on what you need now vs. what can wait
The goal is straightforward: complete Total Log Cabin Restoration done right, then simple maintenance that keeps your cabin beautiful and protected.
Nearby Colorado Service Areas
Pencil Log Pros serves Colorado mountain communities and Front Range foothill areas where log homes face intense UV exposure, snow, and rapid weather swings. If you’re not sure whether you’re in range, start with our service areas hub.
Get Your Cabin Back to Beautiful (And Keep It That Way)
If your cabin has peeling stain, failing chinking, or any signs of rot, don’t wait for another season of snowmelt and UV exposure to make it worse. A professional assessment can tell you what’s urgent, what’s manageable, and what a true Total Log Cabin Restoration plan should include.
Pencil Log Pros specializes in Colorado log home restoration, including prep, staining systems, chinking, rot repair, and deck refinishing. We’ll help you understand the condition of your home, recommend a scope that makes sense, and restore your cabin with a system built for mountain weather.
Reach out to Pencil Log Pros to schedule an inspection and get a clear, step-by-step plan for Total Log Cabin Restoration on your log cabin.
FAQ: Total Log Cabin Restoration
What is Total Log Cabin Restoration?
Total Log Cabin Restoration is a full-system exterior reset that addresses prep, repairs, sealing, staining, and maintenance planning. It’s designed to solve the causes of failure, not just improve appearance.
How long does Total Log Cabin Restoration take?
Most projects take several days to a few weeks depending on home size, access, weather windows, and how much prep and repair is required. Cabins with heavy finish failure or rot repair needs typically take longer.
How often does a Colorado log cabin need to be re-stained after Total Log Cabin Restoration?
It depends on exposure and the system used. South and west walls usually need attention sooner, while shaded sides can last longer when moisture is controlled and maintenance is consistent.
Is media blasting safe for Total Log Cabin Restoration projects?
Media blasting can be safe and effective when the right media, pressure, and technique are used. It should be selected based on the coating type and wood condition, not as a one-size-fits-all solution.
What causes log rot, and how do you prevent it after Total Log Cabin Restoration?
Rot is caused by persistent moisture. Preventing it means removing damaged wood, correcting water pathways, sealing details properly, and using a finish system that protects without trapping moisture.
Do you always have to remove the old stain before Total Log Cabin Restoration?
Not always. If the existing system is intact and compatible, a maintenance approach may work.
If the finish is peeling, uneven, or built up, proper removal and prep are usually necessary to restore adhesion and avoid early failure.
Can you do Total Log Cabin Restoration on one wall instead of the whole cabin?
Sometimes, especially when one elevation is more exposed and failing faster. The key is matching the system so the restored wall blends visually and performs properly with the rest of the home.
What’s the difference between chinking and caulking during Total Log Cabin Restoration?
Chinking is typically used in larger log-to-log joints, while caulking is used for smaller detail transitions like trim edges and penetrations. Both matter, and using the right product in the right location prevents drafts and water intrusion.
Will Total Log Cabin Restoration improve drafts and energy efficiency?
It often does. When chinking, caulking, and sealing are restored properly, air leaks decrease and interior comfort improves during cold Colorado winters.