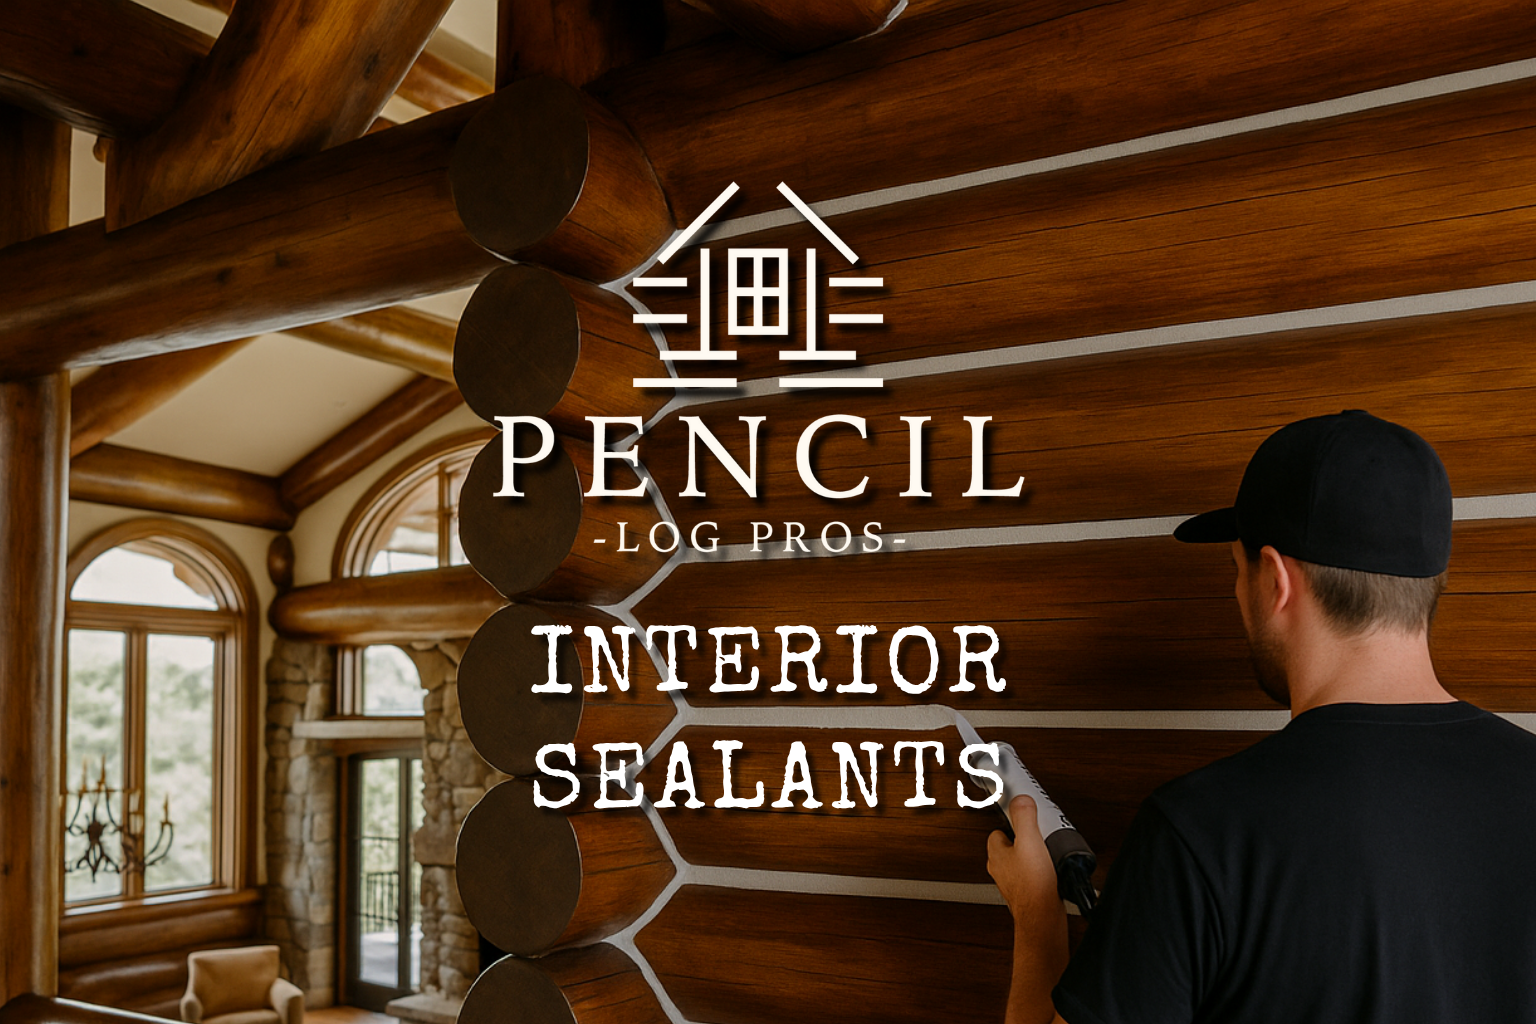
Your home should feel calm, quiet, draft-free, and beautifully finished. Interior sealants do more than “fill gaps.” When specified and applied correctly, they control air movement, stop dust infiltration, sharpen paint lines, and allow wood structures—especially logs and timbers—to move naturally without tearing your finishes apart. Pencil Log Pros brings a wood-first, building science approach to interior chinking, caulking, and air sealing, so your rooms look better, perform better, and stay that way longer.
We’re finish specialists who understand how joints should be designed, how materials need to breathe, and how to integrate sealants with paint, stain, and clear coats. Whether you live in a full log home, a hybrid timber structure, or a conventional framed interior, our in-house technicians deliver clean, consistent lines and measurable comfort gains.
Want a broader view of everything we do inside the home? Visit our one-stop hub for a complete list of services at Interior Services.
Interior Sealants vs. Wood Coatings: What’s the Difference?
People often mix these terms, but they are not the same. Sealants—like chinking and caulking—are used in joints and transitions to control air, dust, sound, and light. Coatings—such as stains and clear finishes—are applied to the surface of wood to protect, color, and beautify, while allowing the substrate to breathe.
For log and timber interiors, that distinction matters. Joints need a flexible, elastic material that can stretch as wood expands and contracts. Visible log joints often require elastomeric chinking with carefully selected backing to maintain the correct geometry and movement capability. Wood surfaces, on the other hand, do best with breathable stains and clear finishes that protect without trapping moisture. This “joint vs. surface” mindset is the backbone of durable, attractive results.
Why Interior Sealants Matter
Sealing the gaps you can and cannot see is one of the highest-value upgrades inside any home. Here’s why our clients prioritize interior sealants:
- Comfort: Reduce drafts, hot and cold spots, and nighttime light leaks at window and door perimeters.
- Energy Efficiency: A tighter interior boundary reduces uncontrolled air exchange for steadier temperatures and less HVAC strain.
- Cleaner Look: Crisp, consistent lines where trim meets walls, stair stringers meet drywall, and built-ins meet niches.
- Dust & Odor Control: Fewer pathways for attic dust, exterior odors, and garage smells.
- Noise Reduction: Perimeter sealing and acoustical products tamp down sound transfer room-to-room and from outdoors.
- Finish Longevity: Prevent micro-cracks and shadow lines that make fresh paint or stain look tired before its time.
Where We Use Interior Sealants
Our technicians map joints and transitions throughout your interior, then match each location with the right material and backing. Typical targets include:
Log & Timber Structures
- Between Log Courses: New elastomeric chinking or refresh work for existing joints.
- Checks & Notches: Selective sealing where interior-facing cracks collect dust or create light leaks.
- Transitions: Log-to-drywall, log-to-stone, and log-to-trim interfaces with concealed backer strategies.
- Penetrations: Outlets, fixtures, vents, and conduit paths through log walls.
Conventional Framed Interiors
- Trim-to-Wall: Base, casing, crown, and wainscot caps for sharply defined paint lines.
- Stair Stringers & Treads: Seam control to prevent dirt collection and shadowing.
- Built-Ins & Cabinet Scribes: Clean joints where furniture-grade pieces meet walls.
- Ceiling Plane: Attic hatch, can lights, bath fans, and top-plate seams to reduce stack-effect losses.
- Windows & Doors: Interior perimeter seals that improve comfort and reduce whistling.
- Mechanical & Electrical: Plumbing stacks, hose bib penetrations, electrical boxes, and data ports.
Materials We Trust—and When We Use Them
Every joint and substrate calls for a specific solution. We stock and specify a curated set of professional-grade products because the wrong sealant can fail fast—or cause more problems than it solves.
Elastomeric Chinking
Used in visible log joints where movement is significant and aesthetics matter. Modern chinking offers a range of textures and colors to complement different woods and finishes. It is paired with backer rod to create the ideal “hourglass” cross-section that maximizes adhesion at the bond lines while allowing the center of the bead to flex seasonally.
Acrylic & Siliconized Acrylic Caulks
Our go-to for paintable trim-to-wall joints and drywall transitions. These products tool cleanly, have low odor, and accept paint reliably. They are excellent for creating smooth lines in living areas, hallways, and bedrooms where a tight visual finish is important.
Urethane & STP Hybrid Sealants
Reserved for higher-movement, higher-adhesion demands where standard acrylics can’t keep up. These chemistries bond aggressively to a wider set of substrates and maintain elasticity over longer spans. We use them strategically to avoid over-stiffening joints.
Specialty Sealants
- Acoustical Sealant: Tacky, long-lasting materials for sound-rated assemblies and media rooms.
- Fire/Smoke-Rated: For code-critical penetrations that must maintain compartmentalization.
- Low-/Zero-VOC: Options for sensitive interiors or occupied projects that require minimal disruption.
Color Matching, Texture & Finish Compatibility
Sealant lines should either disappear or look intentionally designed. We color-match chinking to your log tone or choose a subtle complement to accent the architecture. For painted spaces, we specify paintable sealants and sequence the coats so sheen stays consistent and lap marks are minimized. Our team also evaluates finish compatibility to prevent issues like plasticizer migration or adhesion problems near clear coats and stains.
Our Interior Sealant System
Great outcomes are the result of a disciplined workflow. We use a repeatable sequence that respects joint design, material science, and aesthetics.
1) Inspection & Joint Design
We walk the interior with raking light, identify visible and hidden gaps, and measure joint width and depth. From there, we determine whether to use a round backer rod, foam tape, or another type of backing. The goal is consistent geometry that supports the sealant’s rated movement.
2) Surface Preparation
Contaminated or dusty surfaces sabotage adhesion. We clean, degrease when necessary, and mechanically abrade glossy or unstable substrates. Failed caulks are carefully removed. Adjacent surfaces are masked for crisp edges and easier cleanup. Protection—floors, fixtures, and furnishings—comes first.
3) Priming & Backing
Some substrates, like dense woods, metals, and masonry, benefit from primers that promote adhesion. Backer rod is sized to set the correct depth and shape of the sealant bead, reducing three-sided adhesion and allowing the joint to stretch without tearing away from the edges.
4) Application & Tooling
We control bead size for consistency, maintain a wet edge, and tool with pressure to wet out the bond lines. For large spans, we work in phases to manage cure windows and avoid skinning before tooling. Our finishers check lines under consistent light to ensure straight, uniform profiles.
5) Integration With Finishes
Paintable sealants are allowed to cure to the manufacturer’s recommended window before coating. Where stains and clear coats are present, we sequence work to avoid contamination and protect delicate surfaces. For wall and trim finishing after sealing, coordination with the painting team yields the cleanest results.
6) Quality Check, Cleanup & Homeowner Walkthrough
We evaluate adhesion, profile, and continuity, then remove masking and reset rooms. Leftover materials are labeled by room and location for future touch-ups. During the walkthrough, we share care tips and note any optional upgrades that might boost comfort or appearance.
Building-Science Benefits You Can Feel
The gains from interior sealing are not just visual; they’re measurable in comfort and performance.
- Stack Effect Control: Warm air rises and escapes through the top of the home, pulling in cold air down low. Sealing the ceiling plane—attic hatches, can lights, top-plate seams—pays the biggest dividends.
- Thermal Comfort: Reducing convective drafts eliminates cold corners and “ghosting” shadows near gaps.
- Sound Attenuation: Perimeter sealing and acoustical products reduce flanking paths for noise.
- Cleaner Indoor Air: Limit the infiltration of dust, pollen, and odors from attics, crawlspaces, or garages.
Special Considerations for Log Homes
Logs move more than conventional framing. That movement is part of their charm—and part of the challenge. We design joints to move without tearing the finish. Rigid fillers or non-breathable films on wood create future failures. Instead, we seal the joints with elastic materials and protect the surfaces with breathable finishes that let the wood exchange moisture safely.
If your log home needs broader care—rot repairs, surface restoration, or UV-worn clear coats—our restoration team can coordinate sealing with structural and finish work. See how a comprehensive plan protects value over time at Log Home Restoration.
Ideal Projects We Handle
- First-Time Interior Chinking: Bring new or previously unsealed log interiors up to a clean, durable standard.
- Chinking Refresh: Replace aged, cracked, or dirty joints with modern elastomerics and correct backer geometry.
- Whole-Home Trim Caulking: Prep for repainting with consistent lines that elevate the final finish.
- Window & Door Perimeter Reseals: Target drafts and night-time light leaks for instantaneous comfort gains.
- Acoustical Packages: Offices, nurseries, and media rooms with upgraded sound control at penetrations and perimeters.
- Ceiling Plane Air Sealing: Attic access points, can lights, and bath fans to reduce stack-effect losses.
- Targeted Problem Solving: Seal specific rooms or transitions where you feel airflow or see persistent dust lines.
Project Sequencing With Wood Finishes
Sealants work best when scheduled in conjunction with coatings. If you plan to refresh interior wood tone or clarity, we’ll coordinate the timing so tooling doesn’t mar finished surfaces and coating passes don’t contaminate sealant joints. For log interiors, breathable finishes complement movement-friendly joints; learn how coatings and clear finishes protect and beautify wood at Log Staining & Clearcoat.
When interior design calls for stained wood accents—such as beams, mantels, and built-ins—we integrate sealants to ensure profiles stay crisp without telegraphing through transparent finishes. For whole-home wood color work, explore our natural-wood approach at Interior Staining.
Chinking, Caulking & Sealant Options
Not every gap needs the same product. We’ll present options and explain tradeoffs so you can choose the balance of aesthetics, durability, and budget that fits your goals.
- Visible Log Joints: Textured elastomeric chinking with color coordination to highlight or downplay the joint line.
- Paint-Grade Trim Joints: Smooth, paintable acrylics that disappear under the final coat.
- High-Movement Transitions: Urethane or STP hybrids with robust adhesion for longevity.
- Performance Upgrades: Fire-rated or acoustical sealants where code or comfort demands more.
Seeking a more in-depth exploration of visible log-joint work? Our dedicated guide breaks down options, profiles, and color strategies at Log Chinking & Sealant.
Safety, Cleanliness & Occupied-Home Protocols
Most interior sealing happens in furnished, lived-in rooms. We design our workflow to keep your space functional and clean while we work.
- Protection: Floors, fixtures, and furnishings are covered; sensitive areas get zip walls and clean pathways.
- Low Odor: We prioritize low- and zero-VOC products where performance allows.
- Professionalism: In-house, background-checked technicians; clear communication and respectful conduct.
- Daily Resets: We wrap up clean each day so you can use your rooms with minimal disruption.
Pricing & Estimates: What Drives Cost
We build line-itemed estimates so you can see exactly where the value is. Costs are influenced by the following:
- Linear Footage: Total joint length, including visible and hidden transitions.
- Height & Access: Stairwells, lofts, and vaulted ceilings may require lifts or staging.
- Joint Complexity: Width/depth variations, corners, profiles, and intersections.
- Removal Work: Stripping failed caulks or hard fillers takes time and care.
- Material Class: Chinking vs. acrylics vs. urethanes, plus specialty options.
- Masking & Protection: The level of finish in adjacent areas determines containment needs.
- Finish Sequencing: Coordinated work with painting or staining for the cleanest result.
You’ll receive a clear scope, including joint counts, material types, and cure windows, so you can compare options and prioritize rooms or phases as needed.
Example Project Scenarios
Log Living Room—Chinking Refresh & Comfort Boost
A client with visible light leaks at night and dust lines along outlets opted for a full chinking refresh. We mapped courses, removed brittle areas, installed new backer for consistent depth, and applied color-matched chinking. Perimeter seals at outlets and fixtures eliminated micro-drafts. The room felt warmer, quieter, and cleaner immediately, with joint lines that looked intentional instead of tired.
Whole-Home Trim Caulking—Pre-Paint Upgrade
Before the house received new wall color, we sealed the base, casing, crown, and wainscot caps throughout. Consistent bead size and careful tooling produced crisp, shadow-free lines. When the paint team followed, coverage improved, and sheen appeared uniform under every lighting condition.
Window & Door Perimeter Reseal—Targeted Solution
Homeowners reported whistling noises and temperature swings near a few openings. We inspected, installed foam backer where gaps were oversized, and applied paintable interior perimeter seals. The result was a quiet, draft-free experience without the cost of new unit replacements.
Maintenance & Service Life
Modern sealants last a long time when applied to clean surfaces with proper backing. Still, joints live hard lives—especially where movement, sunlight, or frequent cleaning are factors—plan for simple inspections and occasional touch-ups.
- Visual Checks: Look for edge peeling, cracking, or excessive dirt pickup along lines.
- Cleaning: Use mild soap and soft cloths; avoid harsh solvents that can degrade some chemistries.
- Spot Repair: Many joints can be renewed with light prep and a fresh bead if addressed early.
- Coordination: If you’re repainting or re-staining, schedule sealant inspections beforehand to avoid telegraphing flaws through the new finish.
Integration With Interior Painting & Staining
Interior sealing and finishing are strongest when they move together. Sealed joints create cleaner paint lines and more durable coatings. When your project includes color changes or trim upgrades, our painting team keeps the work synchronized for a flawless result. Learn how we deliver room-ready finishes at Interior Painting.
For wood elements that deserve a natural look—beams, ceilings, mantels, and built-ins—stain and clear finishes enhance grain without compromising breathability. Explore our wood-first color and protection approach at Interior Staining.
What We Don’t Do
- No Rigid Fillers in Movement Joints: Hard materials crack and fail as wood moves.
- No Shortcuts: We don’t “caulk-only” joints that require backer rod—geometry matters.
- No Painting Logs: Paint traps moisture; we preserve wood with breathable systems, not films.
Frequently Asked Questions
Is interior caulking the same as chinking?
No. Caulking is typically smooth, paintable, and used for trim and drywall transitions with moderate movement. Chinking is a textured, highly elastic product for visible log joints with significant movement. Both rely on correct backing and bead geometry to perform over time.
Will the sealant lines be visible?
In painted spaces, lines should disappear under the finish. In log interiors, chinking can be color-matched to blend or contrasted to showcase the architecture. Either way, consistent bead sizing and tooling determine how clean the final look appears.
How long before I can paint over new sealant?
It depends on the product and conditions. Many acrylics are paint-ready within hours; others require longer. We provide cure windows for each area in your scope so your schedule stays on track.
Can you work in furnished, occupied homes?
Yes. We use floor protection, masking, and zip walls to isolate work areas. Low-odor products minimize disruption, and rooms are reset daily.
Why did my previous caulk fail?
Common causes include dirty substrates, missing backer rod, incorrect bead depth, incompatible products, or using low-movement caulks in high-movement joints. Our process addresses each of these root causes.
Do you offer low- or zero-VOC options?
Absolutely. We’ll match low-odor products to the performance needs of each location so you can re-occupy spaces quickly without compromising durability.
A Better Interior Starts With Better Joints
Clean lines, quiet rooms, and steady comfort don’t happen by accident. They come from intelligent joint design, the right materials, and careful application by pros who understand how wood and buildings move. Pencil Log Pros brings those pieces together with in-house technicians, tidy job sites, and a results-first mindset.
If you’re planning a broader finish refresh—painting, staining, or clear coats—sequencing those steps with interior sealing compounds the results. Begin with a conversation and a line-itemized plan that respects your priorities and timeline. From there, we’ll deliver the kind of work you can feel the moment you step back inside.
When you’re set to tighten up joints, stop drafts, and elevate your finishes, our team is ready to help.